On this page
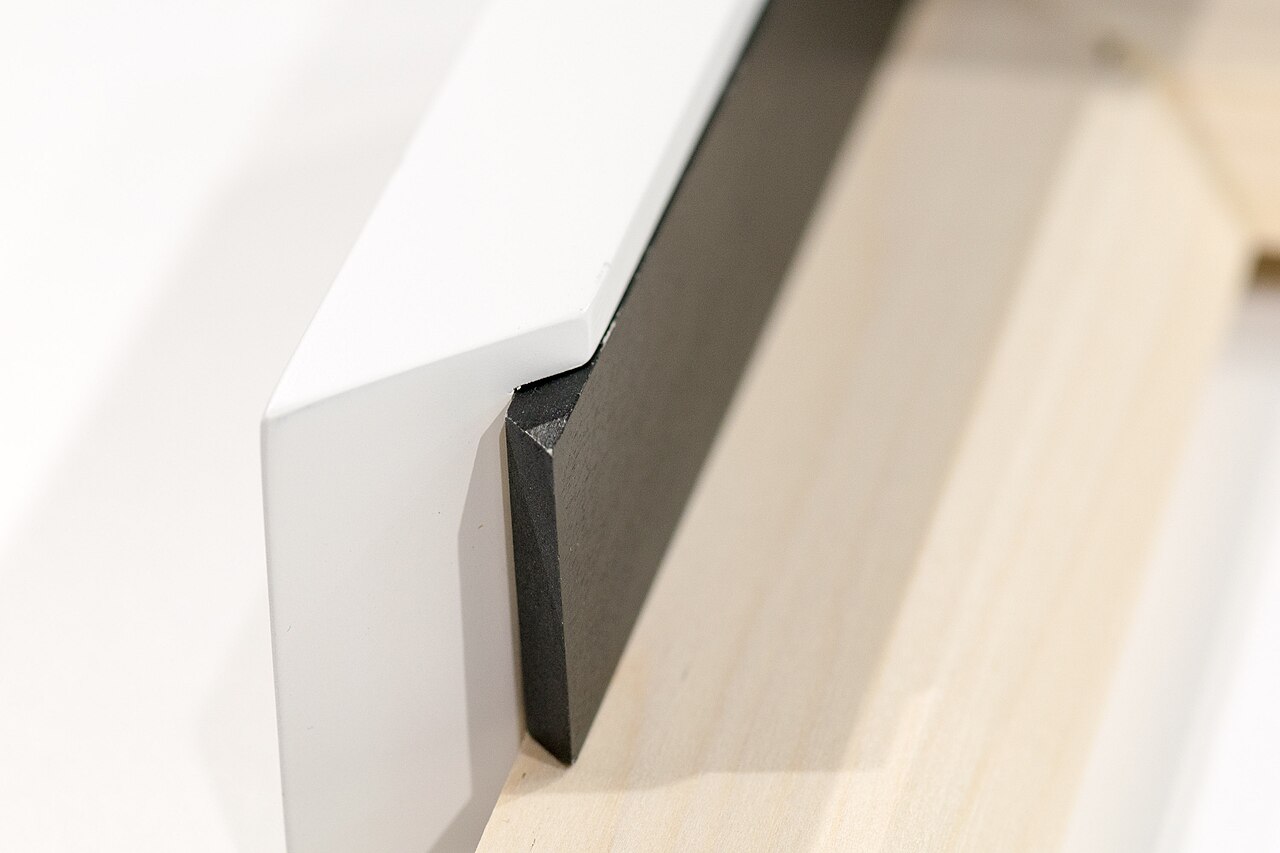
A frame has three jobs: it protects the work, makes it easier to display and improves how it looks, and those jobs can pull against each other. Put protection first. A well-chosen mat colour does nothing for a print that is yellowing behind the wrong board, and acids from poor-quality framing materials can migrate into paper and discolour it. Paper, canvas and board need different treatment, so this guide gives the quick route and the steps first, then the detail behind each part.
The everyday version
For a poster or a print you want to keep, you do not need a conservation framer. Buy a box frame, which holds the glass away from the print without a window mount, or a standard frame with a pre-cut acid-free mat, and assemble it yourself. Keep the print off the glass, hang it out of direct sunlight, and avoid glass-and-clip sandwiches that press on the work.
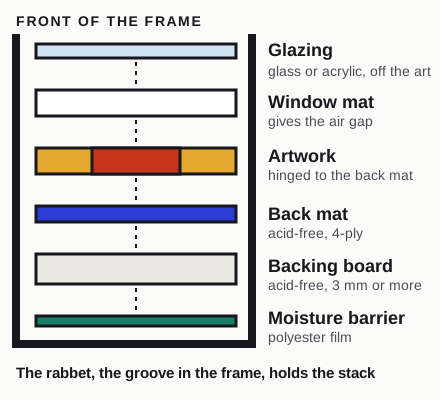
Four terms will help you through the rest. The mat is the card border around the picture. The glazing is the glass or acrylic front. The backing board closes the back. The rabbet is the recess in the frame that holds the whole stack.
What does it cost in the UK? One London gallery publishes an in-house framing price list that includes the glass. A3 (297×420 mm) in a black or white box frame is £32 and A2 (420×594 mm) is £50. In ash wood the same sizes are £42 and £62. Non-reflective AR70 glass costs extra: £15 on A3 and £28 on A2. That is one seller’s list for ready-sized frames, not a market average, so get two or three quotes. A bespoke frame with a cut window mat and conservation glazing will cost more.
Frame a print yourself, in order
These steps follow the conservation notes for a flat, stable print. For a pastel, charcoal or other loose medium, ask a framer instead, because the spacing and glazing rules change.
- Choose the frame first. The rabbet has to hold mat, backing board and glazing, about 2 cm in total.
- Cut or buy the mat. Use 4-ply conservation board for both the window mat and the back mat, with the window overlapping the paper by at least 2 mm to 4 mm.
- Join the two boards. Tape them along one edge with gummed linen tape, on the longest edge for the most support. The artwork should not touch the tape.
- Hinge the work. Small and medium works need only two T-shaped hinges at the top. Use wheat starch paste, and never glue or tape on the artwork.
- Check the window. Close the mat and make sure the opening shows the image, signature and title.
- Prepare the glazing. Cut it 3 mm smaller than the rebate and dust it with a lint-free cloth.
- Assemble. Glazing first, then the mat package, then a neutral pH backing board, fixed with pins or brads and no tape.
- Seal and hang. Seal the back with gummed linen tape and fit hooks and screw eyes.
A good framer will do all of this for you. The steps show you what to ask about, and a framer should be able to reverse the work later. If you are short of time, hold on to six rules: use only chemically stable materials, never let the artwork touch the glazing, give the stack a rabbet about 2 cm deep, hinge the work and never glue it down or tape it all round, skip the clip-and-glass sandwich, and keep the finished frame out of direct sunlight.
What goes into a conservation frame
A conservation-grade frame for paper is a stack: glazing, a window mat, the artwork hinged to a back mat, a backing board, and a frame deep enough to hold all of it. Every material in the stack must be chemically stable. The Library of Congress preservation guidelines and the Canadian Conservation Institute note on framing works of art on paper set out the specification part by part, and the table follows them.
Swipe the table sideways to see every column.
| Part | What to specify |
|---|---|
| Window mat and back mat | 100% cotton rag or chemically purified, lignin-free wood pulp board; pH-neutral or slightly alkaline (pH 8.5); 4-ply minimum |
| Hinges | Non-adhesive hinging where possible, or Japanese tissue hinges applied with refined wheat starch paste |
| Glazing | UV-opaque acrylic, or UV-filtering glass; the artwork must not touch it |
| Backing board | Acid-free, lignin-free board at least 3 mm thick, with a moisture barrier of polyester film |
| Frame | Metal or wood; a wood rabbet lined with barrier film; deep enough for the whole package, about 2 cm in total |
| Fixing | Pins or brads; no tape |
Long-term display of paper is not recommended, because light exposure causes permanent damage that shows up as fading, yellowing, embrittlement and other irreversible changes. For a work of personal, monetary or historic value, the preservation advice is to mat and frame a facsimile and keep the original in good storage. If an original must be framed, preservation matting and framing is essential for limiting the damage. Where you hang the result matters as much as the frame: how to hang art and how to protect art from sunlight and humidity cover that side.
The mat: purpose, margins and colour
A mat is a thin, flat piece of paper-based material inside the frame that decorates the piece and keeps the art away from the glass. The second job is not cosmetic. Condensation that forms on the inside of the glass can transfer to the work and cause water damage, mould or mildew, and a window mat creates the air space that stops the image touching the glazing. The CCI note on matting gives the full cutting method.
Matboard sold as “100% rag fibre” comes either buffered (pH 7.5 to 8.5) or unbuffered (pH 7). Board made from highly purified wood pulp buffered to pH 8.5 is an acceptable and more economical alternative. White or buff 4-ply matboard is generally recommended, and the same four-ply, acid-free or buffered grade is the standard for archival framing of paper. Cheaper board has a high acid content that yellows, fades and damages the picture.
Windows are usually cut with a 45-degree bevel, which improves the look and reduces shadows. The edges of the mat must overlap the edges of the artwork by at least 2 mm to 4 mm, because the overlap holds the work down. The window must still be large enough to show the image, platemark, signature, title and any other significant notations.
Most mats use an equal margin all the way round. Normally the top and side margins match and the bottom is slightly larger for a balanced look. The eye tends to centre an image higher than its physical centre, so a heavier bottom margin draws it back to the middle. On colour, an understated white or off-white suits almost anything. If you want drama, or the piece is almost uniformly white, a grey or black mat sets it off. A second accent mat is optional, and if you add one, take its colour from something in the work itself.
Plain 4-ply board is the usual spacer, but plastic glazing holds a static charge, so the distance between work and plastic can be increased with 8-ply board, or with a double mat made of two superimposed windows. Pastel work needs even more room, at least 5 mm of clearance between glass and painting, because static from the glass can lift pastel dust. Where a mat is not wanted for aesthetic reasons, other spacers can give the same separation.
Glazing: glass, acrylic and UV filters
Glazing is the protective covering in a frame, and the two common materials are glass and plastic. Whichever you choose, it should be inert, rigid, impervious to air and water vapour, and colourless. The CCI note on glazing materials is the most detailed free reference. Its main findings sit in the table, with the Library of Congress view alongside.
Swipe the table sideways to see every column.
| Property | Glass | Acrylic and other plastic |
|---|---|---|
| Static | Picks up very little, so it suits loose (friable) media | Readily picks up and holds a charge; not recommended for friable or flaking work |
| Scratching | More resistant than many plastics | Scratches more easily |
| Weight and breakage | Sharp, breaks easily and is a hazard when cut, installed or shipped | Lightweight and less breakable |
| Large works | A 2 mm sheet stays rigid even on large works | Less rigid, tends to bow; large pieces must be 3 mm thick |
| Usual thickness | 2.0 mm or 2.5 mm; the 2.5 mm sheet is more resilient and less likely to chip | Often too thick for an average frame, which is made for thinner glazing |
Acrylic can filter out ultraviolet, and it is lighter, less brittle and therefore safer to handle than glass. Its downsides are that it scratches more easily, is less rigid and tends to bow in a frame once the sheet passes a certain size. Anti-static acrylic is now available and can be used with powdery media such as pastel, charcoal and graphite pencil.
Ultraviolet radiation weakens and yellows paper and other organic materials, and it can fade or change dyes and pigments. Clear glass transmits over 90% of visible light but cuts out UV only below 300 nanometres, so UV-absorbing filters are designed to remove the band between about 300 and 400 nm. Filtered glazing is recommended when UV levels are higher than 75 microwatts per lumen and the windows and lights have no filters. Tru Vue conservation glass transmits less than 75 microwatts per lumen, and Plexiglas UF-5 does the same job for acrylic.
Do not lean on the filter alone. None of these materials filters out all the harmful UV, so use them together with sensible light levels. Whatever the filter, light of every kind still ages paper. That is why a framed watercolour still belongs on a shaded wall: protection from the glass is not enough for sensitive media.
Framer Claire Russell, interviewed by the painter Sophie Ploeg, lists the glass a framer will quote in plain terms. Standard float glass is the cheapest and 2 mm thick, with a greenish tint along the edge. Water white glass is the same 2 mm sheet with no tint, which suits fine art when you want true colour. UV-filtered glass of 2 mm filters out 99.9% of harmful UV rays but has a warm orangey tint. Anti-reflect water white glass, also 2 mm, makes the artwork look as if there is no glass at all and carries a 70% UV filter as a bonus.
Standard non-glare glass is etched on one side to scatter light and cut reflections, but it looks hazy unless it touches the artwork. Because conservation framing needs a space between the work and the glazing, that kind of non-glare glass is not recommended. Coated glass such as the Tru Vue reflection-control range can be used at a distance from the artwork.
Cut glazing 3 mm smaller than the inside rebate so that it just drops into place. Too tight and glass will snap and plastic will bow; too loose and gaps let dust into the frame. Dust glazing with a lint-free soft cloth, especially acrylic. Remove the glazing before using a liquid cleaner of any type, or spray the cleaner onto the cloth and never straight onto the glazing. On plastic, use acrylic cleaner and cheesecloth rather than rough paper towels.
Hinging, backing and sealing
Hinging is the best way to attach a work on paper to its mat, because it holds the paper securely while letting it move a little as humidity changes. That freedom matters. High relative humidity makes paper swell and expand, and the paper then looks wavy or, in the worst cases, wrinkled. Paper taped down all the way round has nowhere to go and will bow or ripple.
Use Japanese tissue hinges with refined wheat starch paste, or non-adhesive mounts such as photo corners. Conservators use wheat starch paste, not glue or tape, to attach hinges to the artwork. Commercial gummed and pressure-sensitive tapes are convenient but often have poor ageing properties, and glue, rubber cement, pressure-sensitive tape and masking tape all harm paper. The T-hinge is the strongest and most versatile for standard matting, and most works on paper need two, with more for larger objects. In archival framing the work is not glued down, so that anyone in future can remove it safely.
Behind the mat goes a neutral pH backing board that is not part of the mat itself. Many common backing materials contain harmful acids and resins that can migrate to the artwork, so masonite, corrugated cardboard, wood and other materials that are not acid-free are not recommended. The Library of Congress specifies acid-free, lignin-free corrugated board with an additional moisture barrier, or corrugated polyethylene or polypropylene, in either case at least 3 mm thick. The moisture barrier is metalized or plain polyester film.
Secure the package in the frame with pins or brads and no tape, or with finishing nails or glazier’s points. Seal the join where the backing board meets the frame with tape to keep out dust and airborne pollutants. Brown kraft tape is commonly used, but gummed linen tape is better because it is more stable. A dust cover on the back also helps preserve a piece over time.
The frame itself
A frame for paper needs a rabbet deep enough to take the mat, the backing board and the glazing, about 2 cm in total. The three parts should fit snugly but not tightly. Metal clip-together frames are not always deep enough for all three. If the frame is wood, line the rabbet with a barrier film such as aluminium or polyester tape so acids in the wood cannot move into the mat package.
The cheap sandwich method, where the work is held between two sheets of glass or between glass and board with clips, is not recommended. It offers little protection from dust or atmospheric pollution, which still intrudes through the exposed edges, and it puts unnecessary pressure on the artwork.
If you are re-using an old frame, examine it first for damaged or missing moulding, lost gilding, loose joints and warping, and replace any glass that is chipped, broken or brittle. Hanging hardware has to carry the weight. Picture wire should be strong enough to support the frame, and a more secure method is to put hooks in the wall and hang the frame from its screw eyes. Nylon cord and string go brittle or fray, so a framer prefers low-stretch polyester cord.
A painting on canvas is simpler
A frame protects and supports a painting during handling, storage and display. Correct framing technique is essential to keep the painting safe, and the frame must be strong enough to carry the painting’s weight.
Oil paint on canvas is generally hardier than paper, so you would skip the glass and the mat, though you may still want moulding around it. Allow 3 to 6 mm (1/8 to 1/4 in) on every side between the frame and the painting so the wood can expand when relative humidity rises. The paint surface must not come into direct contact with the frame’s rabbet, or the painting’s front edges can be damaged.
Do not use nails to secure a canvas painting to its frame. Spring clips pin the canvas in securely without screwing anything into it. Choose frame colours that complement the painting and do not overpower it, so a dark painting suits a dark frame and the reverse. If you are unsure of the width, choose a narrow frame over a wide one. A frame done properly should last as long as the painting.
Framing on a budget
The cheapest route that still protects paper is a standard-size frame and a pre-cut mat bought off the shelf and assembled at home. After that, the savings are small and specific.
Second-hand frames from thrift, antique and resale sources are often the lowest price, and a coat of paint or stain can transform one. Check the rabbet depth and the condition of the glass first. Pre-framed art on clearance works too: swap in your own print and keep the frame, but replace any backing that is not acid-free. Multipack frames lower the price per frame when you have several pieces.
Custom mats ordered online, cut to a standard outer size, fit an unusual print into an off-the-shelf frame, and 4-ply conservation board is the grade to choose. A floating frame larger than the art looks matted with no mat to cut, though floating means no spacer, so keep it for flat, stable work. A poster hanger is the fastest and cheapest way to display a large print, but it does not protect the print, so avoid kitchens and bathrooms. An unusual-size print can also be mounted on larger contrasting archival paper, which costs about $3 a sheet at a craft store (price as seen on 20 October 2026), so that it fits a standard mat and frame.
Spend where it counts. Custom framing is highly recommended when framing for preservation, and UV-protective glass is worth adding when the piece is special. For a work you cannot replace, the cheapest safe option may be to frame a good facsimile and store the original.
The wall comes next
A good frame can still be hurt by a bad wall. Keep it out of direct sunlight and intense light, away from working fireplaces, radiators and air vents, on interior walls rather than exterior ones, and off the floor, attics and basements. For heights and layouts, see how to hang art, and for the print side of the question, original art vs prints. The whole framing and care section groups the related guides.
Common questions
How can I frame artwork myself?
Cut a 4-ply conservation mat with a window that overlaps the paper by at least 2 mm to 4 mm, hinge the work to the back mat with two T-hinges, then add glazing, a neutral backing board and pins. Use a frame about 2 cm deep.
What is the cheapest way to frame art?
Buy a standard-size frame and a pre-cut mat and assemble them yourself. Second-hand frames and pre-framed art on clearance cost less still, but avoid glass-and-clip sandwiches, which protect poorly and press on the work.
What are the basic rules for framing art?
Use chemically stable materials throughout, keep the artwork off the glazing, give the stack a frame about 2 cm deep, and hinge the work rather than gluing it. Hang it away from direct sunlight.
Read next
Framing, hanging and care
How to hang art: height, spacing, hooks and where not to put it
How high to hang a picture, how far apart to space a group, what to put above a sofa, which wall fixings to trust and where light and heat will harm the work.
Originals, prints and editions
Original art vs prints: how to tell them apart and what each is worth
How to tell an original painting, an original print and a reproduction apart: texture, magnification, edition numbers, signatures, techniques and price.
Sources
- Preservation Guidelines for Matting and Framing · Library of Congress, Preservation · loc.gov · checked 20 October 2026
- Paper collections FAQ (preservation) · Library of Congress, Preservation · loc.gov · checked 20 October 2026
- Framing Works of Art on Paper (CCI Notes 11/9) · Canadian Conservation Institute · canada.ca · checked 20 October 2026
- Glazing Materials for Framing Works on Paper (CCI Notes 11/3) · Canadian Conservation Institute · canada.ca · checked 20 October 2026
- Matting Works on Paper (CCI Notes 11/5) · Canadian Conservation Institute · canada.ca · checked 20 October 2026
- Basic care: works of art on paper · Canadian Conservation Institute · canada.ca · checked 20 October 2026
- Framing a Painting (CCI Notes 10/8) · Canadian Conservation Institute · canada.ca · checked 20 October 2026
- Mat (picture framing) · Wikipedia · en.wikipedia.org · checked 20 October 2026
- How to frame art: an interview with a professional framer · Sophie Ploeg (interview with framer Claire Russell) · sophieploeg.com · checked 20 October 2026
- Framing 101: art framing basics · Elizabeth Person · elizabethperson.com · checked 20 October 2026
- Framing: custom frames and price guide · Atom Gallery, London · atomgallery.co.uk · checked 21 October 2026
- The Experts Guide to Framing and Hanging Art · One Kings Lane · blog.onekingslane.com · checked 20 October 2026
Image credits
- Close-up of the corner of a picture frame in cross section — Art Graphics, photo from Wikimedia Commons, CC BY-SA 4.0, via commons.wikimedia.org

Published · Updated . Prices, duty rates and rules change: each source shows the day it was checked. How we check facts · Report an error.